Wednesday, April 1, 2009

View Passwords Using Firefox Or Netscape


i will consider firefox same process happen to netscape..


Whenever you log in to a website using your username and password, you'll be prompted by Firefox whether you'd like Firefox to remember this password.


If you click on Remember, the next time you visit the website, it'll automatically enter the username and password for your convenience.

Now, back to the topic. Let's say you saved your GMail password in Firefox. After months or years gone by and you don't remember the password you set for my GMail. You started to panic and desperately need to get back your GMail password.

Don't worry, here's how you can find the hidden GMail password in Firefox.

Firefox is much better than Internet Explorer in terms of managing "remembered" logins. In Internet Explorer, there is no built-in feature where you can manage or view your saved login information. That's why you need third party tools to reveal the passwords hidden under asterisks. As for Firefox, you can access remembered passwords with a few clicks.


To view your remembered passwords in Firefox browser, go to Tools, and click on Options. Go to Security tab and click on the Show Passwords button. A remember password dialog box will appear. Click on the Show Passwords button again and a new column with password will appear.


Basic techniques to create a frame

taman


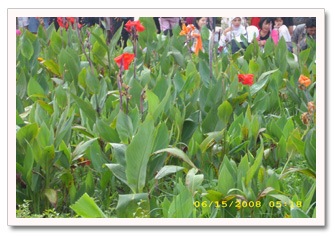
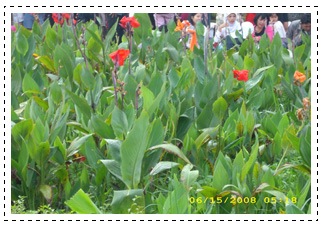
To create the frame effect at Adobe Photoshop is very easy and maybe needs time not more than one minute, but that is for an expert not for those who are not yet familiar with that program. For those who are still confused to create a frame as the example above at Photoshop, Kang Rohman has written the guides as below. I hope that it is not disappointing.

First to be noted that there are a lot of ways to create a frame, people say many ways to Rome, so the guides below is one of many ways that Kang Rohman can do. The second one that Kang Rohman uses Adobe Photoshop CS2 in this tutorial, if you are not using that version, you can adapt it because there are not so many difference among them. Let’s get started!

  1. Prepare one image you want to add the frame to it.
  2. Open your Adobe Photoshop program
  3. Click File menu, then select Open…, or press Ctrl + O on your keyboard. Please refer to the folder where your image is stored

    open

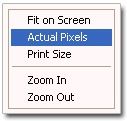
  4. Be sure that your image in 100% scale because usually the image will appear first in less scale. Select Zoom Tool (Z), right click on the image, and then after the selections appear, select Actual Pixels.

    zoomtool actual

  5. If the image to be edited has too large size, you can reduce it. Click Image menu then select Image Size…, or press Alt + C + I on your keyboard. Set the size you want. E.g.: Width: 300 pixels.

    image

  6. In order to add the frame to the edge of the image, you need to resize the Canvas becomes the larger one than the image size. To do this, click Image menu, select Canvas Size…, or press Alt + Ctrl + C on your keyboard, set the canvas size into larger. For example, if previously it has the size as Width: 300 pixels and height 201 pixels, set to the ones become Width: 350 pixels and height: 250 pixels.
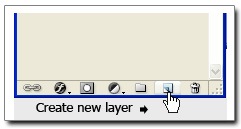
  7. Please create a new layer. Click Layer menu then select New and choose Layer…, or press Shift + Ctrl + N on your keyboard, give a name to your new layer (anything). Or another way is just click the icon Create New Layer

    Newlayer createlayer

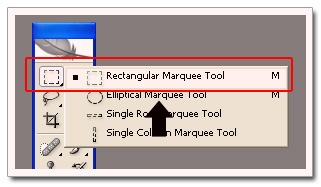
  8. On the tool menu, select the Rectangular Marquee Tool (a dash-line box). If another one appears, just right click on the tool then select Rectangular Marquee Tool

    rectangular

  9. The cursor will change automatically becoming the sign plus (+), navigate the cursor to the top left corner of the image and give the space so that it will be formed as a frame. Press the left mouse button, hold and drag to the lower right corner of the image so that it will be formed as a dash-line rectangular that surrounds your image. Release the mouse button you held.

    garis

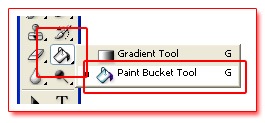
  10. Still on the tool menu, select Paint Bucket Tool (Paint bucket shaped tool) , if another one appears, just right click on the tool, the select Paint Bucket Tool

    painttool

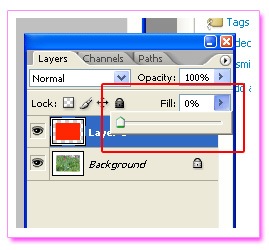
  11. Fill (click) at the area inside the dash-line rectangular you have made as above. You will see the image will be covered by the default color, change the Fill into 0% so that it will be back to transparent.

    fill

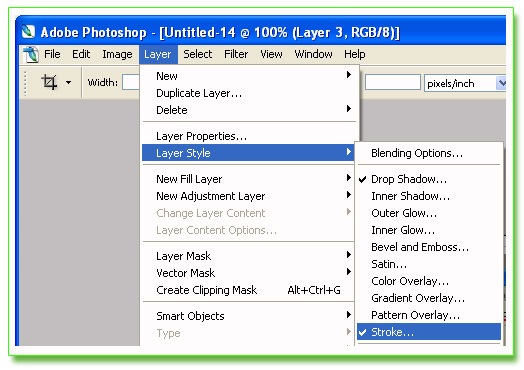
  12. Click Layer menu then select Layer Style then choose Stroke…, or click the icon Add a Layer style then select Stroke

    addlayer stroke

  13. Set the Size into 1 (one), and click at Color to change the color as you want, after the color selection appears, click on the color you want, the click OK.

    stroke

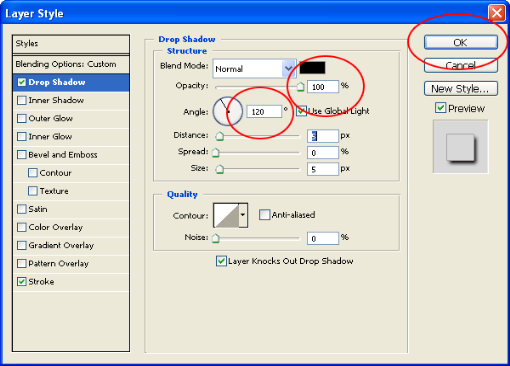
  14. Still on the Layer Style, select and click on Drop Shadow. Set the Angle at 120 and Opacity at 100 (it is an example) then click OK

    dropshadow

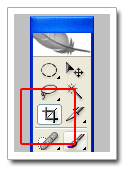
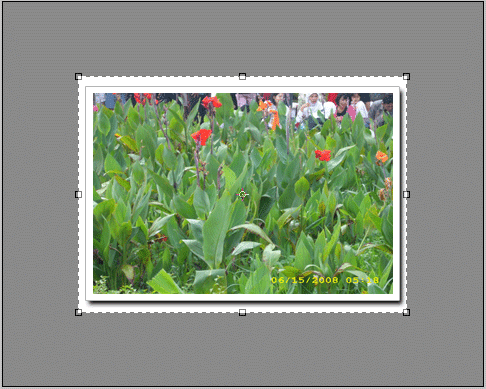
  15. Now your image has a frame. The next step is to crop the image with Crop Tool. Select Crop Tool on the tool menu; navigate the pointer to the top left corner of the frame. Press the left mouse button, hold and drag to bottom right corner of the frame, release. Double click on the cropped-image area. Now the image has been cropped.

    croptool cropping

  16. Click File menu then select Save for Web…, on the option tab, select 4-Up tab. Select the image format you want (GIF, JPEG, PNG-8, PNG-24). Click SAVE button and give a name to your image, then Click Save.
  17. Done

It is very easy, isn’t it? Have a good experiment!


Photoshop dew drop tutorial

Dew Drop Effect

Creating dew drops using Blending Modes" & "Blending Options"

Step 1 Lets create a new document of any size. Also make sure that you make the document "Transparent". after creating the new document the first step is to change the layer’s "Blending Option" to "Screen".

Photoshop dew drop tutorial

View PDF | Print View
by: jeny


Step 2 Next you are going to click on the "Layer Style" icon to add more styles to the water drop. Here are the styles that we will used along with the settings.


In the layers palette, double click on one of the styles that you just added to the layer. Then when the dialog box pops up, you’ll see the option for "New Style". Click it, name the style and hit ok. The "Water" style that you just created will now appear in the styles tab.

Step 3 After creating the style, it’s time to apply that style to the image. Choose an image that you want to apply the style to. select the elliptical marquee tool from the tool box option, while pressing the "SHIFT" from the keyboard draw few circle. Now select the paint bucket tool and fill the selected area "remember its you select the black color". To Apply the dew drop looks lets add some effect.

1.Go to FILTER-DISTORT-POLAR COORDINATE.

2.SELECT THE OPTION RECTANGULAR TO POLAR. click ok

you can see the final image now. try working of different picture.


Knock Out Text Effect In Photoshop

In this Photoshop text effects tutorial, we're going to create some knock out text. By that, I mean we're going to look at how to use one of Photoshop's more interesting shape options to knock out sections of letters that overlap each other! Of course, you can't use shape options unless you're working with shapes, so along the way, we'll see how to convert text to a shape, which opens up a lot more possibilities for us when it comes to creating cool text effects. Here's an example of the result we're going for:

The final knock out text effect in Photoshop. Image © 2009 Photoshop Essentials.com.
Photoshop Text Effects: The final "knock out" text effect.

Let's get started!

Want a better way to learn? Download this tutorial as an easy to read, ready to print PDF eBook!

Step 1: Create A New Blank Document

First, create a new Photoshop document, either by going up to the File menu at the top of the screen and choosing New or by pressing the keyboard shortcut Ctrl+N (Win) / Command+N (Mac). Either way brings up Photoshop's New Document dialog box. Enter the dimensions you need for your document. For this tutorial, if you want to follow along, I'll enter 4 inches for my Width, 2 inches for my Height, and a Resolution value of 300 pixels/inch. I'll also set my Background Contents to White which will fill the background of my new document with white. When you're done, click OK in the top right corner of the dialog box to exit out of it. Your new document will appear on your screen:

The New Document dialog box in Photoshop. Image © 2009 Photoshop Essentials.com.
Photoshop Text Effects: Create a new Photoshop document using the New Document dialog box.

Step 2: Select The Type Tool

With our new document created, we can begin working on our effect. Since this is a text effect, we'll need some text, and for that, we'll need Photoshop Type Tool. Grab it from the Tools palette, or simply press the letter T on your keyboard to select it with the shortcut:

The Type Tool in Photoshop. Image © 2009 Photoshop Essentials.com.
Photoshop Text Effects: Select the Type Tool.

Step 3: Select A Font

With the Type Tool selected, the Options Bar at the top of the screen changes to show options specifically for the Type Tool. Over on the left of the Options Bar is where we can choose a font. Select the font you want to use for your effect. Your choice of fonts will depend on which fonts you currently have installed on your computer. This effect works best with fonts that have big, thick letters, so I'm going to choose Cooper Std. Don't worry about the size of the font for now:

Selecting a font from the Options Bar in Photoshop. Image © 2009 Photoshop Essentials.com.
Photoshop Text Effects: Select a font from the Options Bar.

Step 4: Select A Color For The Text

Next, we need to select a color for our text. If you move further to the right in the Options Bar, you'll find a color swatch. This color swatch shows you the currently selected text color. To change the color of your text, simply click directly on the color swatch:

The color swatch showing the current text color in Photoshop. Image © 2009 Photoshop Essentials.com.
Photoshop Text Effects: The color swatch shows the current text color. Click on the color swatch to change the color.

This brings up Photoshop's Color Picker. Choose a color for your text. I'm going to choose a medium shade of blue. When you're done, click OK to exit out of the Color Picker, and you'll see that the color swatch in the Options Bar has changed the show the color you've chosen:

The Color Picker in Photoshop. Image © 2009 Photoshop Essentials.com.
Photoshop Text Effects: Choose a color for your text from the Color Picker.

Step 5: Add Your Text

With the Type Tool, a font and a color for the text all selected, click inside your document and add your text. I'm going to type the word "PHOTOSHOP", all in capital letters:

The Color Picker in Photoshop. Image © 2009 Photoshop Essentials.com.
Photoshop Text Effects: Add your text to the document.

Once you've added your text, click on the checkmark in the Options Bar to accept it and exit out of text editing mode.

Clicking the checkmark to accept the text in Photoshop. Image © 2009 Photoshop Essentials.com.
Photoshop Text Effects: Click on the checkmark in the Options Bar to accept the text.

Step 6: Resize The Text If Needed With Free Transform

If you need to resize or move your text, or both, go up to the Edit menu at the top of the screen and choose Free Transform, or for a faster way to access the Free Transform command, press Ctrl+T (Win) / Command+T (Mac):

Selecting the Free Transform command in Photoshop. Image © 2009 Photoshop Essentials.com.
Photoshop Text Effects: Go to Edit > Free Transform.

You'll see the Free Transform box and handles appear around your text in the document. To resize the text, hold down your Shift key, which will constrain the aspect ratio of the text as you resize it, then click on any of the corner handles (the little squares) and drag the handle inward or outward depending on whether you need to make the text larger or smaller. To move the text, click anywhere inside the Free Transform box and drag the text to a new location. I'm going to make my text a little bigger by dragging the handle in the bottom right corner outward:

Resizing text with Free Transform in Photoshop. Image © 2009 Photoshop Essentials.com.
Photoshop Text Effects: Resize and move the text if needed with Free Transform.

Press Enter (Win) / Return (Mac) when you're done to accept the transformation and exit out of the Free Transform command.

Step 7: Convert The Text To A Shape

Make sure you have everything spelled correctly because at this point, we need to convert our text into a shape. Once it's converted to a shape, the text will no longer be editable, so double check to make sure you haven't made any mistakes. To convert the text to a shape, go up to the Layer menu at the top of the screen, choose Type, and then choose Convert to Shape:

Converting the text to a shape in Photoshop. Image © 2009 Photoshop Essentials.com.
Photoshop Text Effects: Go to Layer > Type > Convert to Shape.

If we look in the Layers palette now, we can see that our text layer has become a shape layer. Even though the text still looks like, well, text in the document, the letters are now individual shapes, which means we can now work with them the same way we could work with any other shape in Photoshop:

The Layers palette showing the new Shape layer. Image © 2009 Photoshop Essentials.com.
Photoshop Text Effects: The text now appears as a Shape layer in the Layers palette.

Step 8: Select The Path Selection Tool

We need to select all of our letters (shapes) at once. You may think we could use the Rectangular Marquee Tool, but since we're working with shapes, we'll actually need a different selection tool - the Path Selection Tool. Grab it from the Tools palette or press the letter A on your keyboard to select it with the shortcut:

The Path Selection Tool in Photoshop. Image © 2009 Photoshop Essentials.com.
Photoshop Text Effects: Select the Path Selection Tool.

Step 9: Drag A Selection Around The Entire Word

To select all the letters at once, simply click and drag out a selection box around the entire word, just like you would if you were using the Rectangular Marquee Tool. You'll see a thin dotted outline appearing as you drag:

Dragging a selection around the word with the Path Selection Tool. Image © 2009 Photoshop Essentials.com.
Photoshop Text Effects: Drag a selection around the entire word with the Path Selection Tool.

Once you have the entire word surrounded by the selection, release your mouse button. The rectangular selection outline will disappear, and you'll see that each individual letter now has an outline around it, with little squares (called anchor points) sitting at different spots around the letters:

The letter shapes are now selected. Image © 2009 Photoshop Essentials.com.
Photoshop Text Effects: All of the letters (shapes) are now selected.

If you want to learn more about working with paths and anchor points in Photoshop, I cover them in detail in our popular Making Selections With The Pen Tool tutorial which you'll find in the Photoshop Basics section of the website.

Step 10: Select The "Exclude Overlapping Shape Areas" Option

With all of our letter shapes now selected, go up to the Options Bar at the top of the screen. On the left, you'll see a series of four icons, each one showing a different combination of squares. These icons represent different options for how our shapes can interact with each other. The one we want for this effect is the one on the far right - the Exclude overlapping shape areas option. Click on the icon to select it. If you have Tool Tips enabled in Photoshop's Preferences, you'll see the name of the option appear when you hover over the icon:

Selecting the 'Exclude overlapping shape areas' option in Photoshop. Image © 2009 Photoshop Essentials.com.
Photoshop Text Effects: Select the "Exclude overlapping shape areas" option in the Options Bar.

Step 11: Deselect The Letters

In a moment, we're going to drag the individual letters over top of each other so that the shapes will overlap. The option we just selected in the Options Bar will cause the overlapping areas to disappear. Before we can do that though, we first need to deselect the letters, otherwise if we try to drag any one of them, we'll end up dragging all of them at the same time. To deselect the letters, simply click on any blank area in the document. You'll see all the anchor points disappear from around the letters, telling us that the shapes are no longer selected. You may still see an outline around the letters, but don't worry about it for now. We'll remove it when we're done:

The letter shapes are no longer selected. Image © 2009 Photoshop Essentials.com.
Photoshop Text Effects: Click on any blank area of the document to deselect the letter shapes.

Step 12: Drag The Letters Together So They're Overlapping

This is the fun part. With the Path Selection Tool still selected, click on the second letter in the word and drag it towards the left until part of the letter is overlapping the first letter in the word. Like magic, the area that overlaps disappears from view:

Overlapping the letter shapes. Image © 2009 Photoshop Essentials.com.
Photoshop Text Effects: The area that overlaps between the two letter shapes disappears.

Continue dragging each letter towards the left until part of it overlaps the previous letter. For added variety, try rotating some of the letters with the Free Transform command. Simply click on the letter with the Path Selection Tool to select, then press Ctrl+T (Win) / Command+T (Mac) to quickly bring up the Free Transform box and handles around the letter. Move your cursor anywhere outside of the Free Transform box, then click and drag to rotate the letter. Here, I'm rotating the letter T towards the left.

Overlapping the letter shapes. Image © 2009 Photoshop Essentials.com.
Photoshop Text Effects: The area that overlaps between the two letter shapes disappears.

When you're done rotating the letter, press Enter (Win) / Return (Mac) to accept the transformation. Continue overlapping each letter until you reach the end of the word. Your final result should look something like this:

All the letter shapes now overlap each other. Image © 2009 Photoshop Essentials.com.
Photoshop Text Effects: All of the letters in the word are now overlapping each other.

Step 13: Deselect The Vector Mask To Remove The Outline From Around The Text

The outline that's appearing around the text is making things look rather harsh, so let's get rid of it and clean things up. The reason the outline is visible is because we currently have the vector mask selected on the shape layer. If we look at the shape layer in the Layers palette, we can see that it contains a couple of thumbnails. The thumbnail on the right is the vector mask thumbnail, which, as you can see by looking at it, contains the shapes of our letters. If you look closely, you'll see a white highlight border around the thumbnail. This means that we currently have the vector mask selected. Click directly on the thumbnail to deselect it:

The vector mask thumbnail on the shape layer in Photoshop. Image © 2009 Photoshop Essentials.com.
Photoshop Text Effects: Click on the vector mask thumbnail to deselect the vector mask and remove the outline from around the text.

The highlight border will disappear from around the thumbnail in the Layers palette, and the outline will disappear from around our text, allowing us to see what our final effect really looks like:

The final knock out text effect in Photoshop. Image © 2009 Photoshop Essentials.com.
Photoshop Text Effects: The final "knock out" text effect.

To add even more interest to the effect, experiment with layer styles. For example, here's the result I came up with by applying the same layer styles that I used in the Fun, Easy Gel Text Effect tutorial, which you'll find listed with the rest of our Text Effects tutorials:

The final knock out text effect in Photoshop. Image © 2009 Photoshop Essentials.com.
Photoshop Text Effects: The same effect after experimenting with layer styles.

And there we have it!


Adobe Photoshop Starters

Adobe Photoshop is an image editing, or image creating application, with alot of advanced and useful tools.

Definitions, understanding terms:

Image - picture, a visual representation of an object or scene or person or abstraction produced on a surface.

Pixel - the information stored for a single grid point in the image. The complete image is a rectangular array of pixels. A pixel consists of a single color.

Diffrence between canvas size and image size.
The image is an object that was drawn and when changing the size of it, it either shrinks or expands, cavans is the space provided to draw the image on, decreasing the size of the canvas doesn't shrink the image but cuts it off, when increasing the cavas size there is more space provided and you can draw out side of the image.


Transparent - if an image is not transparent, the image is automaticaly a rectangular size, if the image is transparent, for instace a circle will always be a circle, the canvas is transparent so the pixels around the circle are non existent.

Anti-aliasing - Smoothing or blending the transition of pixels in an image. Anti-aliasing the edges on a graphic image makes the edges appear smooth, not jagged.

Layer - layers pile on top of eachother, think of it as earth's layers of soil, crust and so on. You can change th order of layers, depending if you want an image under an image or the other way around.

Filter - under Filter you will find numerous effects you can apply to a image or selected region of an image.

Bitmap - A representation, consisting of rows and columns of dots, of a graphics image in computer memory. The value of each dot (whether it is filled in or not) is stored in one or more bits of data.

Grayscale - An image representation in which each pixel is represented by a single sample value representing overall luminance (on a scale from black to white).

RGB Color - The red, green, and blue (RGB) color system can represent a large portion of the color spectrum by mixing these three primary colors.

Lab Color - a color model developed by the Centre Internationale d´Eclairage (CIE). These standards are internationally accepted standards for all colormetric measurements. The Lab model, like other CIE color models, defines color values mathematically, in a device independent manner. Lab color is consistent color regardless of the device producing the color.
Tools:


I'll start form the bottom and work my way up explaining all the tools that I use.

ImageReady button lets you edit the image in Adobe ImageReady.

Screen Modes - Standart lets you see all the images you're editting in separete windows, the next button maximizes all the windows of the images to the workspace, and the full screen mode maximizes the image to the whole scread over the taskbar.

Foreground and Background Colors - lets you see and change the colors you're editting an image with.

Hand Tool - ...if you know what it does, tell me.

Zoom Tool - Zoom in a particular part of the image.

EyeDroper - Using Alt you can copy a sertain color form an image and draw with that color on the image or a separete image.

Objects Tools - There are Rectagle, Rounded Rectagle, Ellips, Line, Polygon, and Custom Shape Tools, each of which can be draw on an image.

Text Tools - Let's you put text on an image.

Smudge Tool - Smears the image in teh direction you choose.

Blur Tool - Blurs an image in areas you select.

Paint Bucket Tool - Fills a chosen color on to an image with the selected color.

Erase Tool - Erases an image to its background, either white, a selected color, or trasnparent.

Clone Stamp Tool - Using Alt you can select a part of an image and recopy that part to a diffrent image or to a diffrent area of the same image.

Brush Tool - Draws lines of a selected brush in a direction you choose.

Pencil Tool - Draws lines of a selected brush in a direction you choose, without ati-aliasing.

Crop Tool - Crops the image to the area selected.

Move Tool - Moves the objects or layers in the image, or the image itself.

Wand Tool - Selects a color and its shades so that only that part of an image can be remoddified or added effects to.

Lasso Tool - Lets you select a part of an image to be moddified by itself.

Marquee Tools - Let's you select a defined object of an image or creat a defined object.
Options and Settings:
Photoshop lets you create your own workspace that fits you the best.
You can move or get rid of any options and settings windows in your workspace so that it can be used to your best interest.


When creating a new file(File/New...) and you want it to be transparent make sure you choose Transparent under Contents.


This is where you can select the kinds of brushes you want to use with your tools:


At the end when creating transparent images you should always save them as PNGs, when selecting File/Save As...and click on the drop down arrow and select PNG.

If you weren't done with your work, and have created different layers, you can save it as PSD, so that you can finish later. Photoshop will save all your layers, unfotunately it doesn't save your history.

In the top menus you can edit Layers, Edit images(rotate, colors ect.), you can slect and customize your workspace, and in the Filter menu as I've said you can set lots and lots of effects to images. And under Help you will find tutorials on how to use photoshop.


Adobe Photoshop Shortcuts Keys

# Marquee Tools:
Pressing Shift-M toggles back and forth between the rectangular marquee and circular (Elliptical) marquee tools.
# Pen Tools:
To cycle through the standard pen, freeform pen, and magnetic pen tools: press Shift-P.
# Add Anchor:
To select the Add Anchor Point tool press "+".
# Subtract Anchor:
To select the Subtract Anchor Point tool press "-".
# Ruler Tool:
Press U to get the Measure tool. (Tip here: when you use the new Ruler tool, the Info box automatically appears, but here's the cool part. If you measure something that's crooked, the measurement automatically appears in the Rotate Canvas box for you and the proper rotation [clockwise or counter clockwise] is already selected for you. Pretty slick).
# Eraser Toggle:
To toggle between the regular Eraser tool and the Background Eraser, and Magic Eraser, press Shift-E.
# Auto Contrast:
To run Auto Contrast, press Shift-Command- Option-L (PC: Shift- Control-Alt-L).
# Save for Web:
To Save for Web, press Shift-Command-Option-S (PC: Shift-Control-Alt-S).
# Toggle Between History and Art History Brush:

* Press Shift-Y to toggle between the History brush and the Art History brush.
* Extract Dialog Box:
To bring up the Extract dialog box, press Command-Option-X (PC: Control-Alt-X).
* Extract Edge Highlighter:
Within the Extract dialog box, switch to the Extract Edge Highlighter tool by pressing the letter b.
* Extract Fill Tool:
Within the Extract dialog box, switch to the Fill tool by pressing the letter k.
* Extract Edge Highlighter's Brush Size:
Within the Extract dialog box, change the Edge Highlighter's brush size by holding the right Bracket key to make it larger and the left Bracket to make it smaller.
* Direct Select Pen:
To get the Direct Select Pen (the hollow arrow) press "A" (note: you can also hold the Command key [PC: Control-key]) to get this tool anytime you have another Pen tool selected.
* Convert Point Shortcut:
Hold the Option key (PC: Alt key) to get the Convert Point tool when any other Pen is selected.
* Healing Brush:
Press J to get the Healing Brush.


Followers